Physics 364 - fall 2012 - University of Pennsylvania
From
Contents |
Physics 364 : Laboratory Electronics
University of Pennsylvania — Fall 2012
People
- Bill Ashmanskas — ashmansk@hep.upenn.edu — instructor
- Jose Vithayathil — vithayat@physics.upenn.edu — lab instructor
- Zoey Davidson — zoeysd@sas.upenn.edu — teaching assistant
- Simon Hastings — simonhas@sas.upenn.edu — Arduino & LabVIEW lab development
Why take this course?

Electronic devices are all around us. A smartphone lets you walk around an unfamiliar city without fear of getting lost, of missing an important message from a friend, or of making the wrong subway connection. Somehow the phone can detect the sound of your voice, can produce both speech and music, can sense Earth's magnetic and gravitational fields, can respond to the swipe of your finger, can record and display images, can exchange radio signals with a distant cell tower, can receive and decode GPS signals from orbiting satellites, and more. Learning a bit of hands-on electronics will give you some intuition for what goes on (at least in principle, if not in detail) inside those electronic gadgets that enrich our lives. So even if you have no practical reason for doing so, spending one semester learning electronics may broaden your view of the world, and thus can be a worthwhile part of your liberal-arts education.
- How a smartphone knows up from down: http://www.youtube.com/watch?v=KZVgKu6v808 (4 minutes)
If you do work in experimental science, it is likely that some part of your research will involve instruments that turn real-world physical quantities (temperature, pressure, acceleration, light intensity, chemical concentration) into electrical signals that can be measured, recorded, or maybe used in some sort of process control (e.g. turning on and off a laser or a vacuum pump). While many labs primarily use commercial electronics modules for data collection, you may still need to amplify or filter a signal before connecting it to a commercial data-acquisition module. Or perhaps your lab's existing commercial module has a spare output that can be switched on or off under computer control, but you need to amplify that output with a circuit that can provide enough current to drive the stepper motor that moves your experiment back and forth on the tabletop. Understanding the building blocks of electronics can give you more flexibility in how you carry out experiments in your own research.
In some fields of research, experiments require huge numbers of custom-designed electronics modules. The High-Energy Physics group here at Penn has designed key parts of the readout electronics for the CDF experiment at Fermilab (e.g. discovery of top quark), the ATLAS experiment at CERN (discovery of Higgs boson), and the SNO experiment in Sudbury, Canada (resolution of solar neutrino puzzle). These experiments could not be done without teams of scientists who understand electronics (and the associated particle-detection instruments, which are also custom-designed). So knowing something about electronics can be pretty handy if you work in experimental particle physics, radio astronomy, etc.
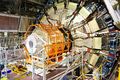
 CDF (Fermilab: near Chicago) |
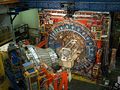
 ATLAS (CERN: near Geneva) |
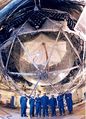 SNO (Sudbury, Canada) |
By the end of the Fall 2010 semester, when I last taught PHYS 364, students had learned enough to do some interesting final projects of their own design. One student designed a distortion box for his electric guitar. Another student programmed a robot to move around the room. Two students made a pong-like "video" game with an LED display (video at http://www.youtube.com/watch?v=l45MOT4Ahd0). Simon Hastings (who took the course in 2010 and is helping me to design a few new labs for the course this fall) built an amplifier sensitive enough to record EKG traces from his own fingertips, then designed a system for getting the traces into a computer for analysis and storage. Another student built an infrared transmitter/receiver pair that could be used to exchange data wirelessly between two devices (e.g. a remote control and a TV set). (He learned enough to get a summer job working on detector electronics with a colleague of mine at Fermilab, near Chicago.) Projects along these lines should be within your reach by the end of the term. If that sort of know-how sounds like fun, then this course is for you.
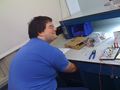 PHYS 364 (fall 2010) student working on final project of his own design |
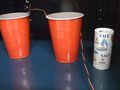 immerses hands in salt water (wires go to amplifier inputs) |
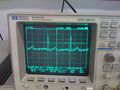 heartbeat visible on oscilloscope |
 and in computer data |
 Pong-like game project |
By contrast, if your only goal in taking PHYS 364 is to meet the Physics Department's requirement that you take a lab course (PHYS 364 or PHYS 414), then it is worth weighing the differences between PHYS 364 (Laboratory Electronics) and PHYS 414 (Advanced Laboratory).
- In PHYS 364, we learn a bit about how real-world signals (e.g. pressure vs. time for a sound wave) can be converted to/from electrical signals (voltages and currents vs. time); we spend a lot of time working with the circuit fragments that are most commonly used for manipulating electrical signals (filters, amplifiers, etc.); and we spend the last 1/3 of the semester learning to connect the analog world of continuous, real-valued signals with the digital world of discrete, integer-valued signals, so that real-world signals can be manipulated by a computer.
- If instead you take PHYS 414, you will learn to reproduce with your own hands several important measurements from the history of physics, such as Cavendish's torsion-pendulum measurement of Newton's G, the lifetime of cosmic-ray muons, the angular distribution of Compton scattering, the Stern-Gerlach experiment showing the quantum nature of angular momentum, etc. Note that PHYS 364 is no longer listed as a prerequisite for PHYS 414.
- If you need to choose one or the other, take PHYS 414 if you prefer to learn the experimental underpinnings of modern physics, and take PHYS 364 if you prefer to learn some of the electronics techniques that are used in a wide range of experimental science and in a large number of everyday gadgets.
Course overview
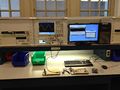 workbench |
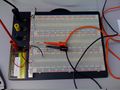 breadboard |
- The overall goal is to be a fun and useful course, after which I intend that you will
- understand what electronics is good for
- know how to use common components & instruments
- know enough to be confident learning more from a textbook (e.g. Horowitz & Hill)
- know how to build solutions to lab/project problems you may encounter later in your career
- have enjoyed time spent in lab — fun change of pace. Pushing little wires into breadboards, measuring signals on an oscilloscope, and debugging misbehaving circuits are very different from the work done in a typical physics course: you may find it a soothing contrast to your other, more equation-centered work.
- Comparable courses' web sites (from which I have borrowed material in many cases):
- Fall 2010 Physics 364 (taught by me): http://positron.hep.upenn.edu/wja/P364_2010/index.html
- Last year's Physics 364 by Prof. Kroll: http://surf.hep.upenn.edu/~kroll/p364_fall11/lecture_notes.html (2009 labs)
- Harvard's Physics 123 by Horowitz/Hill/Hayes: http://www.people.fas.harvard.edu/~thayes/phys123/ (I was a student in this course back in 1991)
- UC Berkeley's Physics 111 BSC: http://socrates.berkeley.edu/~phylabs/bsc/ (I was a teaching assistant for this course way back in 1992)
Like the Harvard course (which was own my favorite course in college, 20 years ago, and which several other Penn physicists tell me they also enjoyed), this course tries to cover "all" of electronics in a single semester. While an electrical-engineering curriculum needs to spend about four semesters on the in-depth study of electronics, this course is a one-semester survey, emphasizing breadth at the expense of depth. My aim is that after taking Physics 364, you can be comfortable looking at a schematic diagram, will recognize familiar circuit fragments, and will generally know enough to be able to confront your own real-life electronics problems with some help from a standard reference textbook (such as Horowitz and Hill).
Workload
- 6-8 hours/week in lab
- We have Detkin Lab (Moore 101) reserved MWF 9am-noon, but you can leave at 11am if you need to go
- You'll turn in a written (or electronic) record of your lab work once/week, usually at the end of Wednesday's class
- Lab write-up doesn't need to be beautiful — just needs to convince us that you did the work
- 2-3 hours/week on reading textbook/notes (due Thursdays)
- Includes answering some straightforward questions by email, to convince me that you've done the reading, and to let me know what I may need to supplement in class
- no homework; no lectures; no midterm exams
- So the total weekly time commitment is about the same as a typical physics course, but in Physics 364 you'll spend a larger fraction of those hours in class. (I estimate that a "typical" physics course requires 3-4 hours in class plus 6-8 hours outside of class per week.)
- optional final project (doing a project reduces weight of final exam)
- final exam emphasizing simple circuit designs — mainly to give me feedback on what you've absorbed
Grading
- 50% — lab write-ups (which shouldn't require any out-of-class time to finish)
- 30% — final exam (reduced to 15% if you do a good final project)
- I'll hand out a comparable practice exam for you to study during reading days
- 20% — email/online responses to weekly reading assignments
- up to 15% — final project (if you choose to do it)
Textbook
- required text: Basic Electronics for Scientists and Engineers, by D. Eggleston
- http://www.amazon.com/Electronics-Scientists-Engineers-Dennis-Eggleston/dp/0521154308
- should be available in campus bookstore, though probably cheaper on amazon.com
- My favorite electronics textbook is The Art of Electronics by Horowitz & Hill
- Alas, many beginning students find it difficult to learn from: it seems to be more widely used as a reference.
- Also, the 2nd edition (1989) is somewhat dated; a 3rd edition should finally be out in a year or so.
- Toward the end of the semester, I'll give you a sample to read, covering a few topics left out of Eggleston's text. If you like the authors' style, consider buying the 3rd edition once it exists.
Lab Reports
The basic idea of a lab notebook is to explain what you are doing with enough detail that if you pick it up six months from now, it will be clear what you did and why you were doing it. Nothing elaborate is needed. (For one point of view on lab notebooks, see en.wikipedia.org/wiki/Lab_notebook .) While lab notebooks have traditionally been bound paper volumes, electronic documents have become popular, as they are easy to find, to search, and to share, and they avoid the hassle of carrying around a physical notebook. A “google docs” word processor document worked well for me (Bill) for several years. More recently, I have started using a wiki to document my own lab work. You can use a spiral notebook, a word processor, a wiki, or any similar means, as long as your notebook is readable, is reasonably neat, and adequately documents your lab work. You can even mix word processing with hand-written notes, e.g. by using your mobile phone camera to email images to yourself of your drawings or calculations, then pasting them in.
To get full credit on lab writeups, please take care to draw diagrams in your lab notebook that make it clear to Jose what circuit you are measuring and how you are measuring it.
Four examples of OK lab notebook technique:
Schedule
| topic | Mon | Wed | (reading Thu/Sun) | Fri |
|---|---|---|---|---|
| first day: overview of course and of lab equipment | Sep 5: first day of class | read my lab1 notes plus text ch1 (resistor circuits) (solutions) | Sep 7: start lab1 | |
| lab1: resistors, voltage dividers, equivalent circuits | Sep 10: continue lab1 | Sep 12: finish lab1 | read my lab2 notes and skim text ch2 (AC circuits) | Sep 14: start lab2 |
| lab2: AC circuits, impedance, filters; diode rectifiers; AM radio | Sep 17: continue lab2 | Sep 19: finish lab2 | read my lab3 notes plus start of text ch6 (opamps) | Sep 21: start lab3 |
| lab3: opamps I (golden rules & applications) | Sep 24: continue lab3 | Sep 26: finish lab3 | read my lab4 notes plus 2nd half of text ch3 (diodes) | Sep 28: start lab4 |
| lab4: opamps II (departures from ideal); comparators; Schmitt trigger | Oct 1: continue lab4 | Oct 3: continue lab4 | read my lab5 notes (about transistors) plus 1st half of text ch3 (semiconductor physics, pn junctions, diodes) | Oct 5: finish lab4 |
| lab5: transistors I (bipolar junction transistors) | Oct 8: start lab5 | Oct 10: continue lab5 | read my lab6 notes plus text ch4 (bipolar junction transistors) | Oct 12: finish lab5 |
| lab6: transistors II (more BJT circuits; homemade opamp) | Oct 15: start lab6 | Oct 17: continue lab6 | read my lab7 notes plus text ch5 (field effect transistors) | Oct 19: finish lab6 |
| lab7: transistors III (field effect transistors; analog switch) | Oct 22: fall break — no class | Oct 24: start lab7 (also part 4) | read my lab8 notes plus text ch8 (digital circuits) | Oct 26: continue lab7 |
| lab8: digital intro; combinational & sequential logic | Oct 29: finish lab7 | Oct 31: start lab8 | read Simon's lab9 notes | Nov 2: finish lab8 |
| lab9: arduino intro | Nov 5: start lab9 | Nov 7: do lab9 part 2 | read Simon's lab10 notes | Nov 9: finish lab9 |
| lab10: arduino + analog/digital conversion | Nov 12: start lab10 | Nov 14: continue lab10 | lab11 reading | Nov 16: finish lab10 |
| lab11: programmable logic (FPGAs); state machines | Nov 19: lab11 intro | Nov 21: no class | Nov 23: thanksgiving — no class | |
| bridge logic/computer gap | Nov 26: continue lab11 | Nov 28: read this and continue lab11 | lab11b reading | Nov 30: continue lab11 |
| lab12: LabVIEW? | Dec 3: continue lab11 | Dec 5: continue lab11 | course content/format survey | Dec 7: finish lab11 — last day of class |
| exam review | Dec 10: review session, 6pm, DRL 3W2 | |||
| final exam | Dec 19: exam, 9am, DRL 3W2 | final projects due (if you choose to do one) |
CircuitLab examples
- Lab 5:
- https://www.circuitlab.com/circuit/wydx9y/ac-coupled-emitter-follower-phys-364-lab-5-part-2/
- https://www.circuitlab.com/circuit/vc3jet/phase-splitter-phys-364-lab-5-part-3/
- https://www.circuitlab.com/circuit/hwsdzz/common-emitter-amplifier-phys-364-lab-5-part-4a/
- https://www.circuitlab.com/circuit/4662hn/common-emitter-amplifier-phys-364-lab5-part-4b/
- https://www.circuitlab.com/circuit/927798/grounded-emitter-amplifier-phys-364-lab5-part-4c/
- Lab 6:
- https://www.circuitlab.com/circuit/spv43d/current-mirror-phys-364-lab-6-part-1/
- https://www.circuitlab.com/circuit/dgu43y/differential-amplifier-phys-364-lab-6-part-2/
- https://www.circuitlab.com/circuit/an5725/differential-amplifier-with-current-source-in-tail-phys-364/
- https://www.circuitlab.com/circuit/f657x8/push-pull-follower-phys-364-lab-6-part-3/
- https://www.circuitlab.com/circuit/cwuqm3/push-pull-follower-with-opamp-feedback-phys-364-lab-6-part/
- https://www.circuitlab.com/circuit/mdtvh2/home-made-opamp-phys-364-lab-6/
- Lab 7:
- https://www.circuitlab.com/circuit/2ede5v/source-follower-phys-364-lab-7-part-1/
- https://www.circuitlab.com/circuit/v5qcgc/phys-364-lab-7-part-2/
- https://www.circuitlab.com/circuit/kwy7z3/cmos-push-pull-follower-phys-364-lab-7-part-3/
- https://www.circuitlab.com/circuit/fuh3fz/simplified-opamp-v2-phys-364-lab-7-part-5/
- Exam circuits:
- Note that I renumbered some of the circuits after writing up the exam.
- https://www.circuitlab.com/circuit/5gjwc7/exam01/ (Q1)
- https://www.circuitlab.com/circuit/mkp6d3/exam02/ (Q6)
- https://www.circuitlab.com/circuit/4fuvwp/exam03/ (Q5)
- https://www.circuitlab.com/circuit/wy73f4/exam04/ (Q2)
- https://www.circuitlab.com/circuit/t8qgfx/exam05/ (Q3)
- https://www.circuitlab.com/circuit/jum7tf/exam06/ (Q4)
- https://www.circuitlab.com/circuit/kgn5mm/exam07/ (Q7)
- https://www.circuitlab.com/circuit/989vc8/exam08/ (Q8)
- https://www.circuitlab.com/circuit/7vscu8/exam09/ (Q9)
- https://www.circuitlab.com/circuit/caawm5/exam10/ (Q10)
- https://www.circuitlab.com/circuit/dmq9d9/exam11/ (Q11)
- https://www.circuitlab.com/circuit/yatj2d/exam12/ (Q12)
- https://www.circuitlab.com/circuit/8us4bg/exam13/ (Q13)
- https://www.circuitlab.com/circuit/acgy55/exam14/ (Q14)
- https://www.circuitlab.com/circuit/4q275z/exam15/ (Q15)
- https://www.circuitlab.com/circuit/d7cza5/exam16/ (Q16)
- https://www.circuitlab.com/circuit/c3rr67/exam17/ (Q17)
- https://www.circuitlab.com/circuit/vb6778/exam18/ (Q18)
- https://www.circuitlab.com/circuit/rgszd4/exam19/ (Q19)
- https://www.circuitlab.com/circuit/2nqp3h/exam20/ (Q20)
- https://www.circuitlab.com/circuit/u2ezr4/exam21/ (Q21)
- https://www.circuitlab.com/circuit/2pd846/exam22/ (Q22)
- https://www.circuitlab.com/circuit/avu6w8/exam23/ (Q23)
- https://www.circuitlab.com/circuit/pv6c9n/exam24/ (Q24)
- https://www.circuitlab.com/circuit/85v28d/exam28/ (Q28)
Video clips
- Bill & Jose demonstrate AM radio receiver: http://youtu.be/46TkwBhpy9g
- Bill & Jose demonstrate annoyingly loud push-pull buffer driving Bill Berner's speaker: http://youtu.be/WuA2bYZw1MQ
- Digilent BASYS2 board plays J.s. Bach's Invention 13: http://www.youtube.com/watch?v=_-ftw98K23w
- and in lab, with opamp summing circuit and push-pull follower driving Bill Berner's speaker: http://www.youtube.com/watch?v=tHcDawYmWtE
- Verilog-coded microprocessor finds prime numbers: http://www.youtube.com/watch?v=g4wzzsKy2uo
- but note the bug! It thinks incorrectly that 961 is prime. Argh!
- Arnav's final project — FPGA-based synthesizer: http://www.youtube.com/watch?v=AUchyYKh_VA
- louder, using big speaker and push-pull transistor buffer! http://www.youtube.com/watch?v=ze5mKuPIk8k
- Martin's Arduino-based project plays Mary Had a Little Lamb: http://www.youtube.com/watch?v=fBRZuNBKfo4
- louder, using big speaker: http://www.youtube.com/watch?v=je_U4IQLHIs
- Arduino reprogrammed to play RHS of Invention 13: http://www.youtube.com/watch?v=pYOSkzw4pPE
Final exam, etc.
- Note that all circuits from exam are listed above under CircuitLab examples. (The Vin and Vout curves came from CircuitLab simulations.)
- Here is a copy of the exam, with my solutions: exam2012_withsolutions.pdf
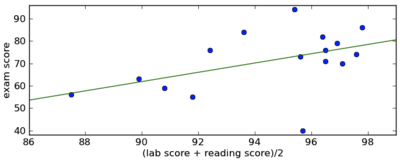
- Scatter plot showing decent correlation between exam score and average of lab+reading scores:
- You might infer that doing that lab work + reading was good preparation for the exam.
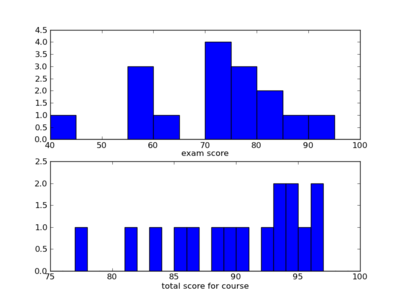
- Histograms of exam scores and total course scores: